
IES VARevitLink User's Guide
Part 2: Importing a VisualAnalysis model into an existing Revit Project
In this section, it is assumed that you have previously exported a VisualAnalysis (see Part 1: Exporting a Revit Project to VisualAnalysis) model and worked on it outside of Revit. Selecting the option when a Revit model already exists will open up a VisualAnalysis project and merge certain things as discussed in this section. The Import Dialog is shown in Figure 4, and will become active when the Import command is chosen. This dialog gives you the option to select which VisualAnalysis objects will be imported and will merge information from the .vap project into the Revit project.
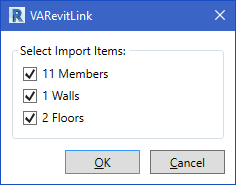
Figure 4: Import Dialog (with an existing Revit Project)
The things imported to Revit are very limited in order to retain the validity of the Revit model. For VA member elements (Revit beams, columns, and braces) only the Family Symbol will be modified if the VA member section has changed. Furthermore, if the VA member section has not been loaded into the Family Symbol list before import, it will not be changed in the Revit model and you will be warned about the failed import.
For VA area elements (Revit floors and walls) only the Revit WallType or FloorType will be changed. If the area material or thickness was modified in VA, this change will be made in the Revit Floor/Wall material and thickness. Note that the Families for Floors and Walls must contain the changed VA material and thickness for the import to work. If the Families do not contain the changed type, you will be warned about the failed import.
After the Import is complete, a Summary of the Import operation will be displayed, similar to the one shown in Figure 5. This Summary dialog will indicate which Revit Symbols have been changed along with the Revit Floors and Walls which had their material/thickness changed. In addition to the changes, any Symbols that could not be found will be shown so that you can load them ahead of the Import and try importing again.
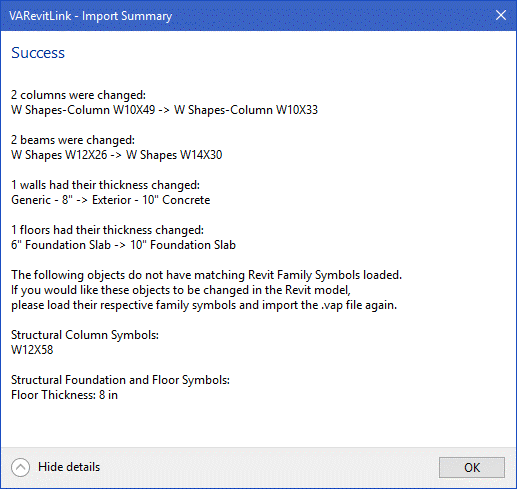
Figure 5: Example Import Summary